Real Lighting Situations: Wall of Monitors
Last year I was asked to capture some shots that can be really tricky if you don’t take time to think it through.
The creative director on this video wanted to show two people in a tech environment unique to this particular large office space. The CD also wanted to incorporate some basic cinematic camera moves to give it a little more interest. Seems pretty easy right?
The shots were going to be used as a 15 sec marquee that would auto play as a seemless loop on a homepage which is quite common these days. First watch the finished piece and then I'll explain the challenges and how we overcame them.

Looks pretty good right? Seems really easy, but actually it isn't.
Step 1: The Location
Obviously the first thing we all do is to take a look at the location. The first tricky thing in this location and the main reason they wanted to use it, was that the entire back wall was comprised of numerous video monitors playing a variety of content. Why is that tricky? Reflections of course.
The next notable observation was that this wall of monitors was located at one end of a large open office environment. What I mean by that is if we are looking directly at the wall of monitors and we turn around to see what was behind us, it was a big bright open office full of people and off in the distance the opposite wall was all windows. So without doing anything but looking with my eyes I could see everything behind me reflected in the wall of monitors.
Next, there was a large 3ft wide pillar fairly close to my wall of monitors. More on that later.
Finally, this office had walls that were an off white which looked greenish on camera because of the common fluorescents lights used to light the office space (very common problem)
The look we were going for was slightly high contrast, clean, cool tone because we were going for the tech vibe.
Step 2: Controlling the Environment
This office was going to be completely open and functioning as normal during the shoot day. I knew I would have to build a room so that I could completely eliminate what was behind me to have control of what was reflected in the monitors. As is often the case the best way to minimize reflections it to have black opposite the reflected surface.
To build my "room" I used 8ft pieces of 1" square aluminum from a couple 8x frames and with combo stands, I hung 3 12x12 solids to create a black wall behind me and a black wall on right side. These were the two open areas of the actual space. The wall on the left side was coincidentally already black so that was nice because it saved me from having to build a third wall on the left. Here is a BTS walk through, it’s not the final setup but shows the space nicely:

The next step to controlling the environment was to turn off the existing fluorescent bulbs. Because this was a large office space, the lighting in the area I was shooting was connected to other large areas so I couldn't just flip a switch because as mentioned, this office was open and people were working. I had to jump on a ladder and physically remove the fluorescents in the area I was filming. There were 10 or so bulbs so it wasn't too bad.
Step 3: Deciding How to Light It
The dolly move for one of the shots was going to be on curved track so the angle of reflection would be continually changing and I would be showing most of the monitor wall during the move. That means that the lights couldn’t simply be placed outside of the visible frame because the frame was continually changing. Normally if we are shooting a static shot or we are simply pushing in like the first shot in this piece we could simply place our light just outside the frame and position the camera at such an angle that the lights aren't visible in the reflective surface, in this case the monitor. Because we were curving around and traveling about 12 ft that wasn't going to work.
At this point I knew I could go in two directions. I could go the TV studio route and light everything from above. The upside would be my set would be clear of stands, flags and lights. The downside is there wasn't a grid of course so I would have to build all of that from scratch. The other larger downside in my mind is that I would have to use multiple smaller fixtures and aim them at specific elements vs one nice large soft source that could wrap around my entire scene.
Here is where the 3ft wide pillar I mentioned earlier comes into play. This pillar while totally in the way, was actually was a blessing. I was able to use it to hide my big soft key light. Now you might be thinking, why not just put up a floppy to block my key light? The nice thing about the pillar is that it was able to remain in the scene to create more depth. In the end, they trimmed the shot at the beginning to save time but here is the longer version of the shot with the pillar:

One thing I should mention is I had to make use of the equipment this company had and then fill in extra gear if necessary. The camera they owned was a Canon 7D and the lighting they owned was a two light 4ft 4bank Kino kit and a basic Arri Kit. Because I knew the camera didn't have much dynamic range when shooting video, I wanted my key light to be bright enough to be within range of the monitors in the background as they would sometimes have white.
Ok, so back to the lighting setup. I decided to use three 4ft 4bank Kinos with Daylight Globes as the Key light going through a 6x6 frame of 1/2 Grid Cloth. I also diffused them prior to the 6x frame with some 250 diffusion (which is also 1/2). This was perfect to wrap my entire table scene for both people.
This room happened to have a table in it which had a frosted glass top. During the initial location scout this immediately spoke to me as an element I wanted to use as a light source because of the tech vibe we were going for. For the table, I laid 2 single 4 ft Kino Flo's with Daylight Globes underneath with 1/4 CTO and some 216 diffusion.
This might be a good time to mention color temperature decisions. Whenever there are computer monitors or TV screens in a shot we typically light with daylight color temperature because the screens are as a standard at 6500K. 5600K color temp on your lights is close enough to 6500K. One more note that many people are not aware of is that the Kino Flo Daylight globes are not 5500K as advertised, they are actually 6500K. I feel that 6500K is way too cool for skin tones when aiming for a "normal" looking scene, so I almost always lamp my 4 banks with 1 Tungsten and 3 Daylight which makes them right around 5200K which I like. I still keep the camera at 5600K. This is the reason I added 1/4 CTO to the single Kinos under the glass table. Because there is only a single bulb you can't mix and match to get a different color temp so you have to use gel. Here are a few shots of the setup to give you a break from all this text you've been reading!
Key Light - Three 4ft 4banks with 1/2 Diffusion and then through 1/2 Grid Cloth on a 6x6ft frame
Key Light - Three 4ft 4banks with 1/2 Diffusion and then through 1/2 Grid Cloth on a 6x6ft frame
From the wall of monitors side you get a nice view of the key light
Ok, so we have our Key light, some stylized light from under the table, what else? Well, I did want to have a subtle soft light on the fill side of our female so the easiest way to do that was to stick a 4x4ft piece of white foam core at an angle behind and above and shoot light into it resulting in a soft back light which would feel like it was coming from the TV Monitors, so it made sense. This approach was very quick and kept the light fixture out of any reflections. I was again using what they had in house so I used a Tungsten Arri 650 Fresnel and put 3/4 Blue gel on it. Here is a shot of that.
On the floor you can see the Arri 650 w/ CTB on it and the foamcore up top
Another angle showing the Arri 650 on the floor
Ok, the last two fixtures were used for the shot where we do the dolly push in to the tablet. The small 2ft 4 Bank kino was used with a piece of white foam core attached to the barn door. I didn't want it to show up in any screens which is why it's facing the opposite direction and the foamcore is angled enough to bounce light back to the talent but the Kino fixture itself is hiding the white foamcore keeping it from reflecting in the screens. Hopefully this photo will help that description make sense.
Showing the small Kino for fill using a piece of foamcore that was just there at the office
The 4ft 4 bank laying on the ground was actually being used to bring up a little ambient light overall. Even though it was pointing slightly forward the reflection off of the inside of the black barn door was actually bringing up the ambient light on the off white wall that monitors were on which I liked.
Step 4: Fixing Issues
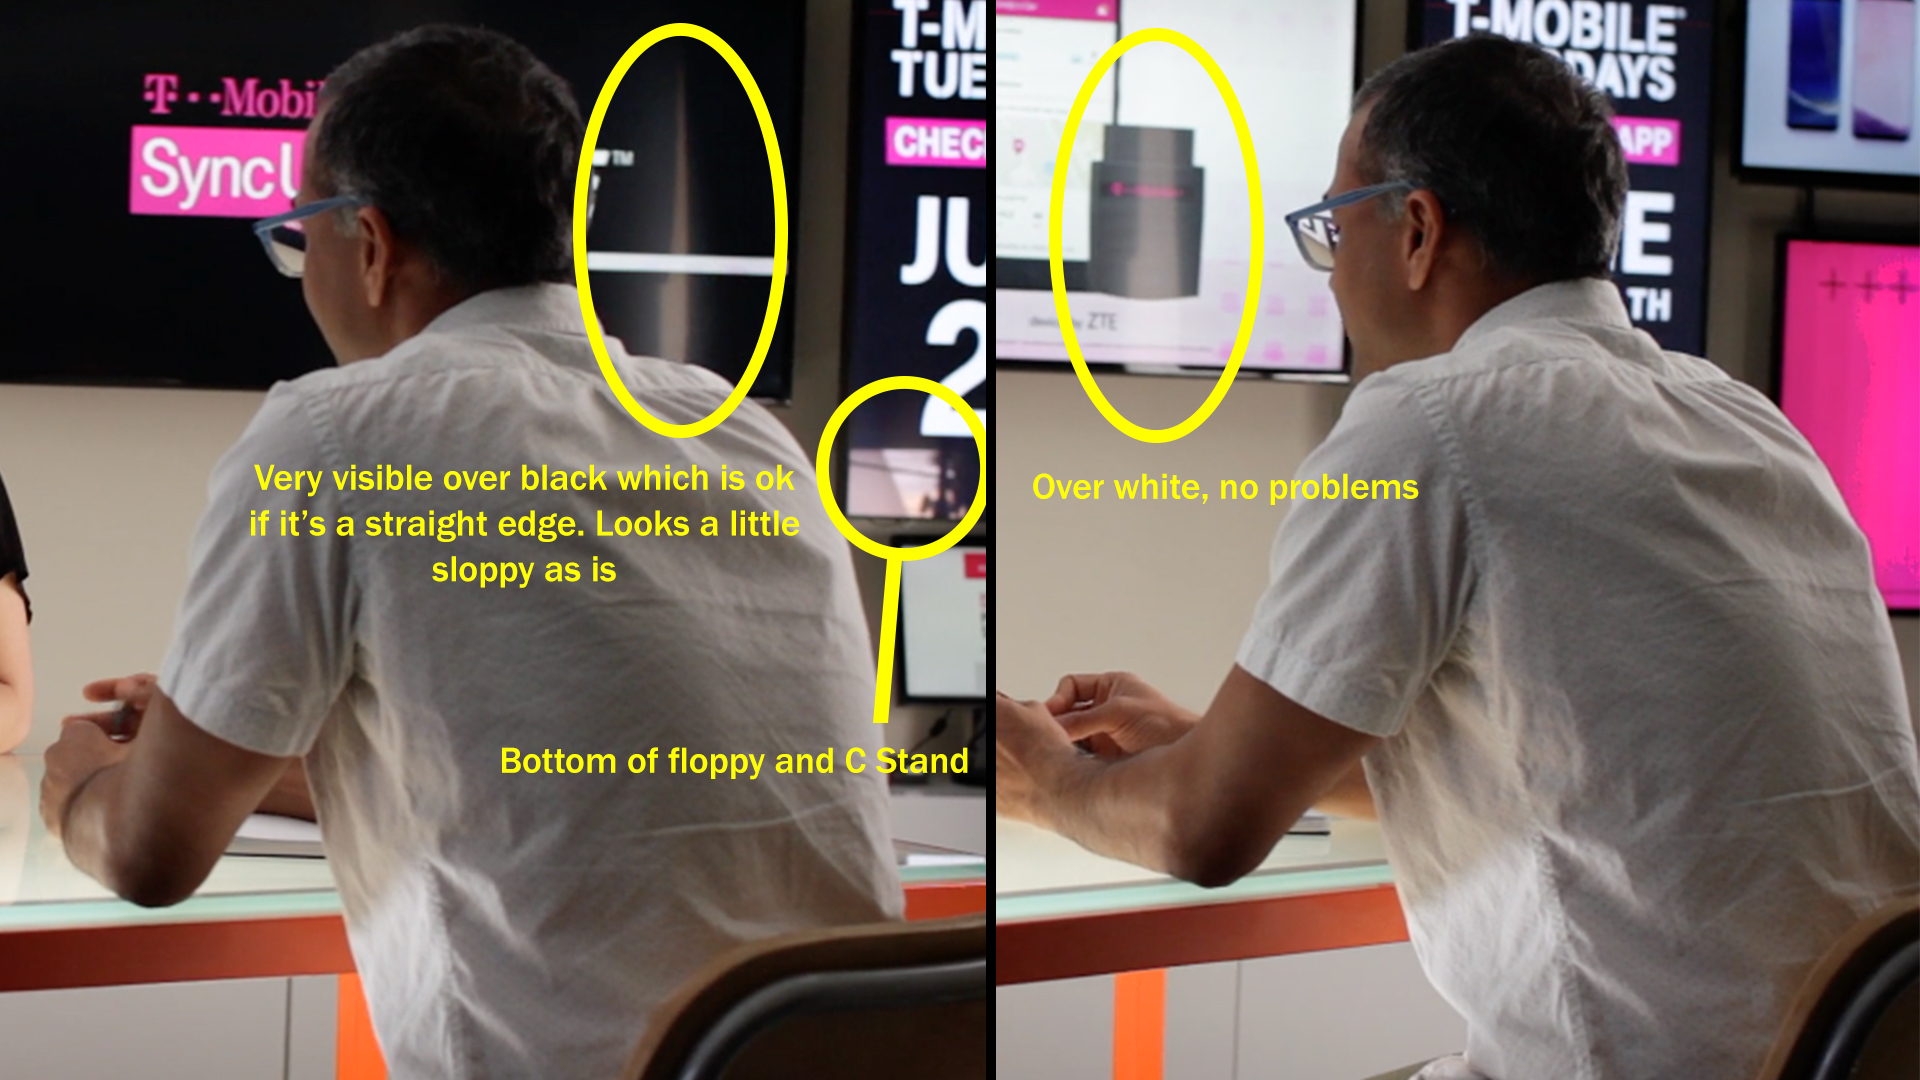
So once it was lit, I checked out the shots in more detail and of course had little things I wanted to fix. The biggest one was my key light showing up in a monitor towards the end of the dolly move. In actuality it wasn't the key light itself that was reflecting, it was the white pillar as you can see here:
Shows the attempted pillar fix
I was able to get rid of most of it using flags but we ran out of time to fiddle so we went with it. You see in this screen shot that it was only noticable when the monitor had black up. To be honest, it's totally ok to have some reflections, it's actually a good thing, but what I would've fixed if I'd had an extra 2 min would be to make sure the reflection had a smooth edge vs one that looks like film equipment. But even as is, no one will notice, I'm just picky. There is a C Stand and Floppy visible also for 20 frames or so. Here are photos showing what I'm referring to.
Click to Enlarge. This is called trying to nail it in camera.
Sloppy Photoshop job to show what I would've made the reflection look like if I'd had the extra 2 min. I also would have lowered the floppy.
In closing, I was pulling this shoot off by myself so whenever that's the case you usually miss something when it's more complicated like this. But overall I think it looked really nice. I had the Creative Director push me on the curved dolly shot and also had her pull focus for me using tape marks on the lens, which was for the shot where we push in to the tablet. One last thing, you may be wondering why the table is on apple boxes. The main reason is because I wasn't happy with how the monitor bezel was cutting through the talents heads. It looked so much better with the talent positioned higher. The second reason was that I felt their posture was better sitting higher up on a stool type chair.
I hope this was helpful to some of you. As always, there are many, many ways to light a scene, this was simply the approach I took that day.
Feel free to comment below. I'll also put all of these photos and a few more in a gallery here so it's easier to look through them.